Blog
Tutorials
React Native Code Push: 2026 Alternatives
React Native Code Push in 2026: App Center is retired. Compare EAS Updates, Revopush, and top alternatives, then migrate your OTA deploys the right way.

Nafis Amiri
Co-Founder of CatDoes

TL;DR: Microsoft App Center, which hosted React Native Code Push, was retired in March 2025. CodePush itself still works through a self-hosted open-source server. For most teams in 2026, EAS Updates is the strongest alternative, with Hermes bytecode diffing and built-in phased rollouts. This guide covers what happened to CodePush, how the top alternatives compare, how to migrate off App Center, OTA deployment strategies, and CI/CD automation.
Last updated: July 2026.
Table of Contents
Why OTA Updates Matter for React Native
What Happened to CodePush and App Center?
Best CodePush Alternatives in 2026
How to Migrate Off CodePush
Building a Reliable OTA Update Strategy
Automating OTA Deployments with CI/CD
React Native Code Push FAQ
Why OTA Updates Matter for React Native
Imagine fixing a typo, changing a button color, or patching a critical bug — and having the fix live for users in minutes, not days. No app store review. No waiting in a queue you can't control. That's what Over-the-Air (OTA) updates do for React Native apps.

A normal app update works like mailing a package. You build the app, submit it to the store, and wait 24–72 hours for Apple or Google to approve it. If you spot a mistake after submitting, you start over. Small fixes and improvements get stuck behind a process designed for full releases.
OTA updates skip this entirely for JavaScript changes. You push the code, and users get the new version the next time they open the app. Here's what that means in practice:
Instant bug fixes: Patch your entire user base in minutes instead of waiting days for store approval.
Faster testing: Change a button color, update copy, or run an A/B test without a full release cycle.
Invisible updates: Your app improves constantly without users opening the store or downloading anything.
The React Native market was valued at USD 325 million in 2024 and is projected to reach USD 499 million by 2031. OTA updates are a big reason the framework keeps growing: teams ship faster and fix production issues in real time. If you're getting started with the framework, our guide on how to create an app with React Native covers the fundamentals.
The key limit: OTA only works for JavaScript and asset changes (images, fonts, config files). Adding native modules, changing app permissions, or updating your app icon still requires a full binary release through the App Store or Google Play.
What Happened to CodePush and App Center?
React Native Code Push was the original OTA update tool for the framework. Built by Microsoft and hosted on App Center, it let teams push JavaScript updates straight to user devices. For years, CodePush was the default choice for any bare React Native project.
That changed when Microsoft retired Visual Studio App Center on March 31, 2025. The entire platform shut down — dashboard, CLI login, update delivery, everything. Developers could no longer push updates or manage deployments through App Center. Only Analytics and Diagnostics got an extension to June 2026.
The shutdown hit thousands of teams who relied on CodePush for production releases. The lesson was clear: OTA updates are too critical to depend on a platform where they're not the core product.
The Self-Hosted CodePush Server
Before the shutdown, Microsoft released a standalone CodePush server as open-source software. This server is fully compatible with the existing react-native-code-push client SDK. You deploy it on your own cloud — AWS, Azure, GCP, or any provider — and manage updates yourself.
The trade-off is clear: you keep the familiar CodePush workflow, but you own the hosting, scaling, and maintenance. Microsoft won't accept issues or code changes on the repo, so bug fixes are your responsibility. For teams with strong DevOps skills, self-hosting works well. For everyone else, a managed alternative is the better path forward.
Best CodePush Alternatives in 2026
The CodePush shutdown created space for several strong alternatives. Each takes a different approach to hosting, pricing, and SDK design. Here's how the leading options compare.
EAS Updates (Expo)
EAS Updates is the most mature OTA platform in the React Native ecosystem today. It's built into Expo's toolchain and works with both Expo and bare React Native projects through expo-updates. If you started with npx create-expo-app, EAS is the natural default. Our guide on how to create an Expo app walks through the initial setup.
Expo SDK 55, released in February 2026, brought major upgrades to EAS Updates:
Hermes bytecode diffing: Only the changes in compiled bytecode get sent, making updates much smaller.
Rollouts: Release to a percentage of users first and expand over time — a feature once exclusive to CodePush.
Republish (rollback): One command reverts a bad update by pushing the previous stable version on top.
Fingerprint tool: Auto-detects if a change needs an OTA update or a full binary build.
Other Alternatives Worth Considering
Stallion is a managed platform with 98% smaller patches through binary-level diffing. It fully supports React Native's New Architecture (0.76+) and plugs into GitHub Actions, Bitrise, and CircleCI. A free tier covers smaller teams.
Revopush is the easiest migration from CodePush. It works directly with the react-native-code-push SDK — you change the server endpoint, not your client code. Updates are 10–20x smaller through diff-based delivery, and it recently added Expo SDK 52+ support.
Hot Updater is open-source and self-hosted. Pair it with AWS S3 and Lambda@Edge for a scalable backend. You get full control with no vendor lock-in, but the setup takes more effort than managed platforms.
Feature Comparison
Feature | Self-Hosted CodePush | EAS Updates | Stallion | Revopush |
|---|---|---|---|---|
Hosting | Self-managed | Expo CDN | Managed | Managed |
CodePush SDK Compatible | Yes | No (uses expo-updates) | No (own SDK) | Yes |
New Architecture | Yes | Yes | Yes (0.76+) | Yes (0.76+) |
Delta Updates | No | Yes (Hermes bytecode) | Yes (binary-level) | Yes (10–20x smaller) |
Phased Rollouts | Yes | Yes | Yes | Yes |
Auto Rollback | Yes (on crash) | Yes (republish) | Yes | Yes |
Expo Support | No | Native | No | Yes (SDK 52+) |
Free Tier | Open source | Yes | Yes | Yes |
As of March 2026, React Native's New Architecture is mandatory starting with version 0.82. The latest release, React Native 0.83, ships with React 19.2, and Expo SDK 55 has dropped Legacy Architecture support entirely. The Hermes engine now cuts cold start times by up to 43%. All four alternatives above fully support the New Architecture.
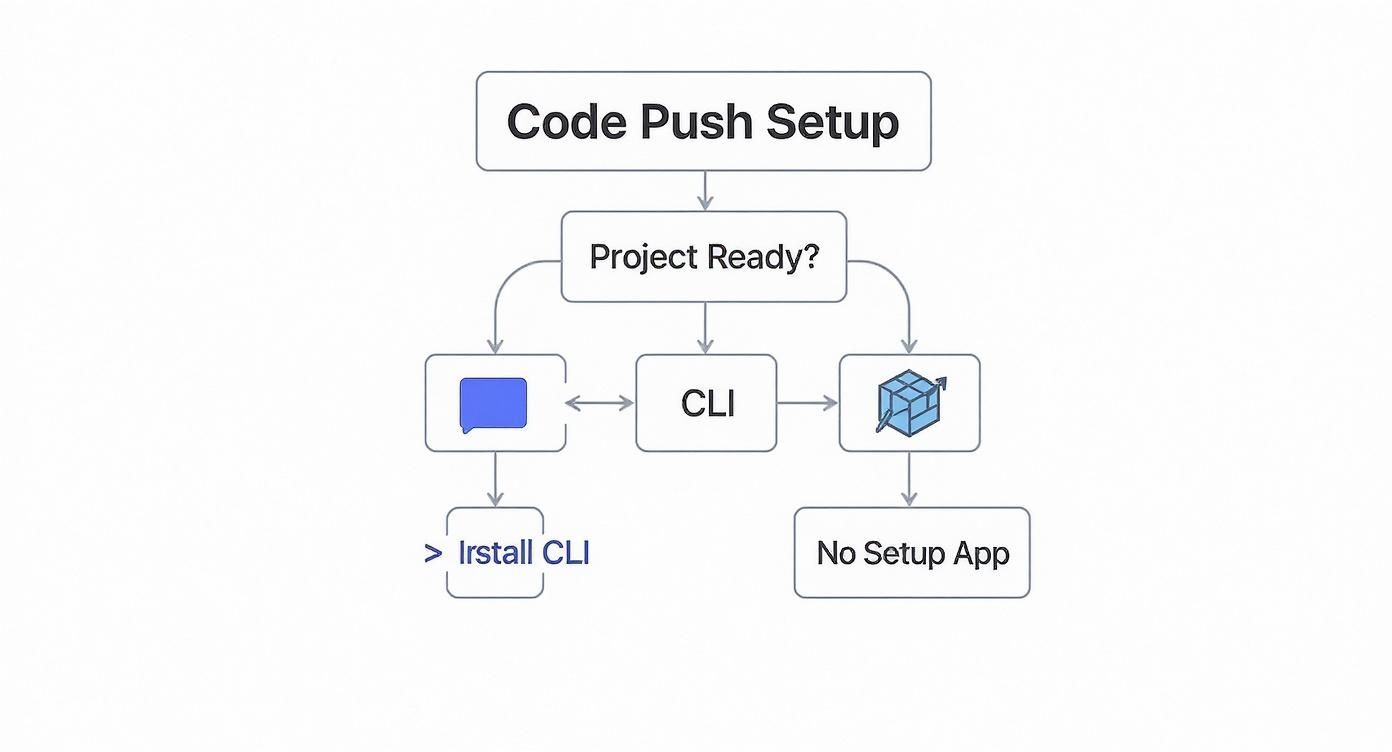
How to Migrate Off CodePush
With App Center gone, every team still on the hosted service needs a migration path off CodePush. The right route depends on how much of the original workflow you want to keep. There are three practical ways to migrate.
Option 1: Keep the CodePush SDK (Fastest Migration)
For the smallest change, stay on the react-native-code-push client and point it at a new server. This is the fastest migration because your app code barely changes.
Self-hosted server: Deploy Microsoft's open-source
code-push-serveron your own cloud, then update the server URL in yourInfo.plistandstrings.xml. You keep full control but own all hosting and maintenance.Revopush: A managed drop-in that works with the existing CodePush SDK. You swap the deployment key and server endpoint — no client rewrite — and get diff-based updates that are 10–20x smaller.
Option 2: Switch to expo-updates (Best Long-Term Migration)
For most teams, migrating to EAS Updates is the more future-proof move. It means replacing react-native-code-push with expo-updates, but you gain active maintenance, Hermes bytecode diffing, and built-in rollouts. The core steps:
Add the Expo modules: Run
npx install-expo-modulesin your bare project, then installexpo-updates.Configure your channel: Set the update channel in
app.jsonand remove the old CodePush initialization from your root component.Swap your publish command: Replace
code-push release-reactcalls witheas update --branch productionin your scripts and CI.
Migration Checklist
Whichever route you pick, work through the same checklist to avoid a broken release:
Match the runtime version: Make sure each OTA update targets the same native binary already installed on user devices.
Ship a store build first: Release a binary that contains the new SDK before you push any OTA update, or existing users won't receive it.
Test rollback before you trust it: Confirm the new platform reverts cleanly in staging before your first production push.
Move keys to CI secrets: Never hard-code the new server or deployment keys in your repo.
Building a Reliable OTA Update Strategy
Pushing updates instantly is powerful, but without a plan it leads to broken apps and angry users. A good OTA strategy manages risk: never ship a buggy update to your entire user base at once.
Phased Rollouts and Update Policies
Release every update to a small group first — 5% or 10% of your active users. This group acts as an early-warning system. If crashes or bugs show up, the damage stays contained while you fix the issue. After a day or two of stable metrics, increase the rollout until it reaches everyone.
You also control when the app checks for updates:
On app start: The most common choice. Users get updates quickly with zero extra effort.
On app resume: Checks when the app returns from the background. Good for users who rarely close apps.
Manual checks: You trigger the check at a set point, like after the user finishes an action.
For most apps, a silent check on app start is the best default. The update downloads in the background and applies the next time the user opens the app. No pop-ups, no extra taps.
Mandatory Updates for Critical Fixes
Some updates can't wait. For critical bug fixes or security patches, flag a release as mandatory. This tells the OTA SDK to install the update right away, getting every user onto the fixed version as fast as possible.
The best strategies combine all three: phased rollouts to contain risk, smart check policies to keep updates invisible, and mandatory flags for the rare cases when speed matters most.
Automating OTA Deployments with CI/CD
Running deploy commands from your terminal works for one person. It breaks with a team. Once multiple people push updates, the manual process gets slow, messy, and error-prone. A CI/CD pipeline automates every step and removes the guesswork.
A Git-Based Deployment Workflow
The most effective approach ties OTA deploys to your Git branches:
Develop branch: Merging into
developtriggers a deploy to your staging channel. QA and testers check changes before anything reaches real users.Main branch: After testing passes, changes merge into
main. This triggers a production deploy to all users.
A merged pull request becomes the single trigger for a safe release. No manual steps, no forgotten commands, no human error.
Setting Up Your Pipeline
For Expo projects, EAS Workflows handles the full pipeline natively. The fingerprint tool checks if your changes need an OTA update or a full binary build, then runs the correct job. You can also schedule workflows for regular build-and-submit runs.
For GitHub Actions or other CI platforms, a typical OTA workflow has three steps:
Install: Set up Node, install packages, and install the CLI for your OTA tool.
Authenticate: Log in with an API token stored as a CI secret.
Deploy: Run the update command for the right channel based on which branch triggered the build.
For EAS, the deploy command is eas update --branch production --environment production. The --environment flag is required in SDK 55 and later. For self-hosted CodePush, use the same code-push release-react command pointed at your own server. For a deeper look at pipeline design, see our guide on continuous deployment best practices.
React Native Code Push FAQ
Can I Update Native Code with OTA Updates?
No. OTA updates only deliver JavaScript bundle and asset changes — images, fonts, and config files. Any native code changes need a full app store release. This includes adding native modules, changing permissions in AndroidManifest.xml or Info.plist, and updating your app icon or launch screen.
Does CodePush Still Work in 2026?
The hosted service does not. Microsoft retired App Center on March 31, 2025, shutting down the dashboard, CLI login, and update delivery. However, Microsoft released an open-source CodePush server you can self-host. The client SDK (react-native-code-push) still works with the self-hosted server. Tools like Revopush also offer direct SDK compatibility without self-hosting.
What Is the Best CodePush Alternative?
EAS Updates is the strongest choice for most teams. It's actively maintained by Expo, supports both Expo and bare React Native projects, and includes phased rollouts, auto-rollback, and Hermes bytecode diffing as of SDK 55. For teams that want CodePush SDK compatibility without self-hosting, Revopush is the easiest migration path.
How Do Rollbacks Work?
Every major OTA platform supports rollbacks. The self-hosted CodePush server auto-reverts to the last stable version if an update crashes on launch. EAS Updates has a republish command that pushes a known-good version on top of the bad one. Stallion and Revopush detect crashes in seconds and revert on their own.
Are OTA Updates Allowed by App Store Rules?
Yes. Both Apple and Google allow OTA updates for JavaScript and interpreted code, as long as the updates don't change the app's primary purpose or bypass review for native features. This is standard practice in the React Native ecosystem, and every tool in this guide works within store policies.
Ready to build and launch your mobile app without the complexity? CatDoes turns your ideas into production-ready React Native apps with AI, complete with automated builds and releases. Start building with CatDoes.
Nafis Amiri
Co-Founder of CatDoes


