
Blog
Tutorials
How to Create an App Without Coding: Your Quick-Start Guide
Discover how to create an app without coding with our step-by-step guide, tools, and tips to turn ideas into a live app fast.

Nafis Amiri
Co-Founder of CatDoes

How to Create an App Without Coding: Your Quick-Start Guide
So, you want to create an app without writing a single line of code? It’s not just possible; it’s now the smartest way for most people to turn an idea into reality. You can do it with no-code app builders: visual platforms that let you design, build, and launch a real app using simple drag-and-drop interfaces.
This approach swaps out complex programming for intuitive, visual workflows, letting you get a functional app into the hands of users in a fraction of the time.
Your Path From App Idea to Launch Without Code
Not long ago, building an app was a world reserved for those with deep programming knowledge. That barrier has completely crumbled. Thanks to a new generation of powerful visual development tools, creating a custom application is now more about smart thinking and creative problem-solving than it is about writing code.
This guide is here to demystify that entire process. We’ll show you exactly how to take your vision and translate it into a market-ready app. Think of this as your personal launchpad, where the only real requirement is your imagination.
The Shift to No-Code Development
The move toward more accessible tech isn't just some niche trend; it’s a fundamental shift in how software gets made. This change is all about the need for faster development and empowering people on the front lines, the marketers, founders, and operations leads, to build their own solutions without waiting in line for engineering resources.
The industry growth reflects this massive adoption. By 2025, it's projected that 70% of new enterprise applications will be built using no-code or low-code technologies. That’s a huge jump from less than 25% back in 2020, and it sends a clear signal: people are demanding more efficient ways to bring digital products to life.
No-code isn't about replacing developers. It's about empowering creators, entrepreneurs, and business leaders to solve problems and validate ideas faster than ever before. It democratizes technology, making app creation accessible to everyone.
This infographic breaks down the straightforward, three-stage journey from your initial concept to a live app using a no-code approach.
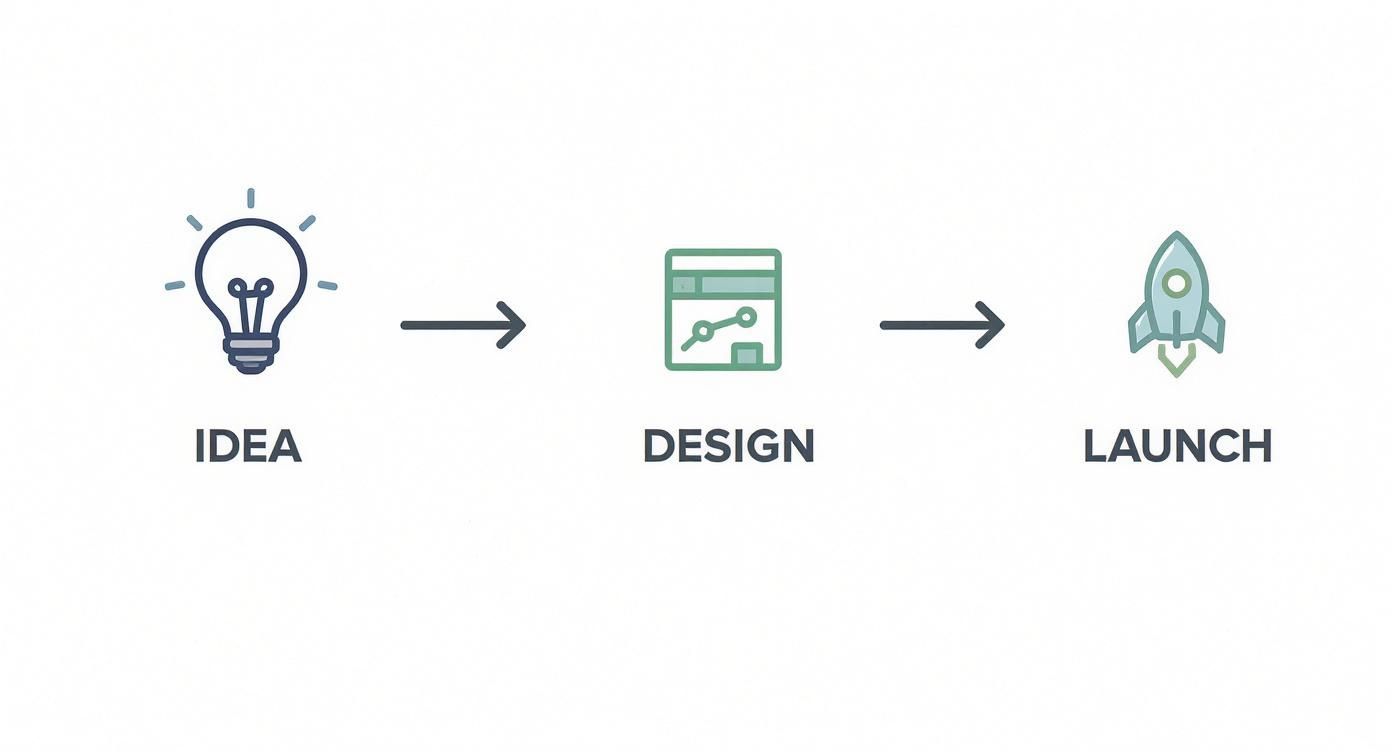
As you can see, the modern app creation process is linear and accessible. It focuses on the core stages of validating your idea, designing the experience, and launching, all without getting bogged down in technical hurdles.
Understanding the Process
Whether you’re using code or not, every great app follows a structured journey. It's helpful to understand the core software development life cycle phases to get a feel for the universal principles behind building good software. The fundamentals don't change, even when the tools do.
This all comes down to a few key questions:
What's the Goal? Seriously, what one problem does your app solve, and who is it for? Get specific.
How Will Users Move Through It? Map out the user journey. How will someone get from Screen A to Screen B to accomplish their goal?
What’s in the First Version? Don't try to build everything at once. Focus on the absolute essential features for your MVP. If you're new to this concept, our guide on what is a minimum viable product is a great place to start.
How Will You Improve? Launching is just the beginning. The real work starts when you gather feedback and start making improvements.
This structured approach is your best defense against building something nobody wants. It saves you time, money, and a lot of headaches down the road.
Before we dive into the step-by-step process, it's helpful to see a clear comparison of no-code versus the old way of doing things.
No-Code Development vs Traditional Coding
Aspect | No-Code Development | Traditional Coding |
|---|---|---|
Required Skill | Strategic thinking, problem-solving | Expertise in programming languages |
Time to Launch | Days or weeks | Months or even years |
Initial Cost | Low subscription fees | $50,000 - $250,000+ |
Flexibility | High for iteration and changes | Rigid; changes require new code |
Accessibility | Open to anyone with an idea | Limited to developers or those who can hire them |
Maintenance | Handled by the platform | Ongoing technical burden |
This table makes it clear why no-code has become the go-to for so many entrepreneurs. It's not just about avoiding code; it's about speed, cost-efficiency, and the freedom to build and adapt on your own terms.
Turning a Good Idea Into a Great App Concept
A powerful no-code builder is an amazing tool, but it can’t rescue a flawed idea. The apps that actually succeed aren't just built well; they’re built on a razor-sharp understanding of a real person with a real problem. This is where the work begins, long before you drag and drop your first button.
It’s about turning that initial spark into a solid, validated plan. So many founders make the mistake of jumping straight into the builder, full of excitement, only to create something nobody actually wants. Let’s avoid that. A little foundational work now is what separates an app that gets forgotten from one that gets traction.
First, Nail Down Your Target User
You can't solve a problem if you don't know who you're solving it for. Vague descriptions like "everyone" or "small businesses" are a recipe for a generic, uninspired app. The real magic happens when you get specific.
The best way to do this is by creating a simple user persona, a fictional character who represents your ideal customer. Give them a name, a job, and a story. What keeps them up at night? What are they trying to get done?
For example, instead of targeting "people who need to be more organized," you might define:
Who: "Alex, the Freelance Designer."
The Struggle: Alex juggles multiple clients and constantly loses track of billable hours, which means lost income and a lot of stress.
The Dream: Alex needs a dead-simple, mobile-first way to log hours on the go and fire off an invoice with a single tap.
See the difference? That level of detail instantly tells you which features are essential and which are just noise.
Identify the One Core Problem You're Solving
With Alex in mind, you can now zero in on the exact problem your app will solve. Most great apps do one thing exceptionally well. Your goal is to find that single, high-value function. Don’t try to build a Swiss Army knife; build a scalpel.
Thinking about Alex again, the core problem isn't just "organization." It's the financial loss and anxiety caused by sloppy time tracking. Suddenly, your app's mission becomes crystal clear: help freelancers capture every billable minute, effortlessly.
Every single feature you consider should directly serve this core mission. If a feature doesn't help Alex track time or invoice faster, it doesn't belong in your first version. This discipline is the secret to building an app without code efficiently.
This sharp focus is your best defense against "feature creep", the temptation to keep adding more and more stuff until your app becomes a bloated, confusing mess.
Do Some Smart Market Research (Without a Huge Budget)
Okay, you have a clear user and a specific problem. Now it’s time to see what else is out there. "Market research" sounds intimidating, but it doesn't have to be. Your goal is simple: find your unique angle.
Start by acting like your ideal user. Head to the app stores and search for what Alex would search for. Think "freelance time tracker," "simple invoicing app," or "hour log for contractors."
Jot down a list of 3-5 competitor apps, then dig in:
Read Their Reviews: The 1-star and 5-star reviews are a goldmine. Negative reviews tell you exactly what users hate and what features are missing. Positive reviews show you what the competition is doing right.
Spot the Gaps: Look for what's missing. Maybe all the existing apps are way too complicated, too expensive, or they lack a key integration that Alex desperately needs. That gap is your opportunity.
Define Your Unique Value Proposition (UVP): This is just a simple sentence explaining why your app is different and better. For Alex’s app, a great UVP might be: "The fastest time-tracking app for freelancers who hate complicated software."
This process doesn't just validate your idea; it gives you a clear roadmap for your build. It ensures you’re creating something unique that meets a real, unmet need, which is the most important step you'll take on this entire journey.
How to Choose the Right No-Code App Builder

You’ve got a validated app idea. Fantastic. Now comes the single most important decision you’ll make: choosing your workshop. The no-code market is packed with incredible platforms, but they are absolutely not one-size-fits-all.
Picking the right builder dictates what you can create, how fast you can do it, and how far your app can grow. This isn't about finding the tool with the longest feature list. It's about matching a platform's soul to your specific vision. The tool you need for a simple local directory is completely different from the one required to build a complex social network.
Get this right, and you're set up for success. Get it wrong, and you're looking at a painful migration down the road. Let's walk through how to make the smart choice.
Assess Your Technical and Scalability Needs
First, be brutally honest about your app's complexity. Is it a simple tool that just displays information, or will users be creating profiles, uploading photos, and interacting with each other? The answer changes everything.
Dig into these key technical points:
Database Complexity: Does your app just show data, or will users create and change their own entries (like posts, listings, or profiles)? Platforms like Bubble are famous for handling complex, relational databases. Others, like Adalo, offer a much more straightforward approach that’s perfect for simpler data needs.
Workflow Logic: Think about all the "if this, then that" rules your app needs. For instance, "When a new user signs up, send them a welcome email." Some builders have incredibly powerful workflow editors that are essential for creating dynamic, interactive experiences.
Scalability: Fast forward a year. If you're expecting thousands of daily users, you need a platform built to handle that kind of traffic without breaking a sweat. This is one of the biggest differences between tools designed for quick MVPs and those built for serious scale.
Thinking about these factors now saves you from hitting a technical ceiling right when your app starts to take off.
Evaluate Integration Capabilities
Your app won't exist in a bubble. Its real power often comes from connecting to other services you already use. A platform’s ability to integrate with third-party tools is a massive deal.
For example, if you plan on taking payments, you'll need a rock-solid connection to a service like Stripe. Want to build an email list? You'll need to link up with Mailchimp or your email provider of choice.
A platform's integration library is a window into its potential. A rich ecosystem of pre-built connections saves you immense time and opens up a world of functionality that you don't have to build from scratch.
When you're checking out a platform, don't just see if it has the integration you need. Look at how deep that integration goes. Can it only push data one way, or does it support full, two-way sync? That small detail can be the difference between a manual headache and a fully automated workflow.
Top No-Code Platform Feature Comparison
To simplify your decision, here’s a direct comparison of some of the leading no-code app builders, focusing on their sweet spots, key features, and pricing models.
Platform | Best For | Key Features | Pricing Model |
|---|---|---|---|
CatDoes | Native iOS & Android apps with complex logic, built fast using AI. | AI-driven development, native performance, automated backend setup (Supabase). | Subscription-based |
Bubble | Powerful, complex web applications and internal tools. | Visual editor, extensive plugin library, highly customizable workflows. | Tiered (based on server capacity) |
Adalo | Simple, clean mobile apps and progressive web apps (PWAs). | Component-based design, easy database setup, app store publishing kits. | Tiered (based on users & data) |
Glide | Data-driven apps from spreadsheets (Google Sheets, Excel, Airtable). | Incredibly fast setup, template library, simple interface. | Tiered (based on users & updates) |
FlutterFlow | Visually building high-fidelity native apps with clean code export. | Drag-and-drop UI, Firebase integration, downloadable source code. | Subscription-based |
This table should give you a starting point, but always dive into the specifics of any platform that catches your eye to ensure it aligns perfectly with your project's goals.
Understand the True Cost
No-code pricing can be tricky. A low monthly fee might look great at first, but hidden limits on database records, active users, or workflow runs can quickly push you into a much more expensive plan.
Look past the sticker price. Analyze the pricing tiers based on what actually matters for growth:
User Limits: How many people can actually use your app on each plan?
Database Rows: How much data can your app store before you have to upgrade?
Monthly Workflows: How many automated actions can your app perform each month?
Custom Domains: Does the plan let you use your own professional domain name?
This kind of analysis helps you predict your costs as your app actually succeeds. The platform that’s cheap for 100 users might become a huge expense at 10,000. For a more detailed breakdown of your options, check out our guide on choosing the best https://catdoes.com/blog/no-code-app-builder.
The move toward this way of building is undeniable. By 2026, an estimated 75% of new applications will be built using low-code or no-code tools. And, incredibly, 80% of those creators will be people outside of traditional IT roles, as noted by Hostinger.com. This just shows how critical it is to pick a tool that truly empowers you to bring your vision to life.
Designing an Experience That Just Works
A brilliant app idea and a powerful no-code builder are a great start, but they mean nothing if the app itself is confusing or a pain to use. Ultimately, your app's success hinges on its User Experience (UX). Good UX isn't about flashy graphics; it's about making your app feel logical, effortless, and maybe even a little delightful.
In a world where users will delete an app after just one bad run-in, a smooth interface isn't just a nice-to-have, it's everything. The good news is you don't need a design degree to get this right. Many no-code platforms, including CatDoes, bake solid design principles right into their components, nudging you toward a clean and effective layout from the get-go.
First, Map Out the User Journey
Before you even think about colors and fonts, you need to draw a map. This map shows exactly how a person will move through your app to get something done. We call this a user flow. It’s a simple, visual path of the steps someone takes to achieve a goal, like creating an account or buying a product.
Creating a user flow forces you to step into your customer's shoes. Does each screen give them what they need to move forward? Is the next step painfully obvious? This process helps you spot dead ends and confusing detours before you've wasted any time building. You can literally sketch this on a napkin or use a simple digital tool. The format doesn't matter, but the clarity does.
From Blueprint to Clickable Model
With a clear path in mind, it's time to create wireframes. Think of these as the architectural blueprints for your app's screens. They are bare-bones, black-and-white layouts that focus purely on structure, not looks. The whole point is to decide where things like buttons, text, and images will live.
Focus on Hierarchy: Make the most important stuff the most obvious.
Prioritize Clarity: Every button and label should mean exactly what it says.
Keep It Simple: Don't cram everything onto one screen. Each screen should have one main job.
After wireframing comes the prototype. This is where your app starts to feel real. A prototype is a clickable, interactive version that connects all your wireframed screens. Most no-code tools make this incredibly simple, letting you link a button on one screen to another with a click. It’s the best way to get a true feel for your app’s flow before you build out all the logic.
Prototyping is the moment your app stops being a document and starts feeling like a product. It's the fastest, cheapest way to test your ideas and get feedback. A simple, unstyled prototype can reveal huge flaws in your thinking that you'd never catch on paper.
Core Principles of Great UI Design
Once your structure is solid, you can shift your focus to the User Interface (UI), the visual look and feel of your app. A great UI makes the app both beautiful and easy to understand, directly supporting the UX you've mapped out. UI is a deep subject, but you can get 80% of the way there by following a few simple rules. For a more detailed guide, check out these essential app design best practices that are universal to any project.
Here are a few tips to get you started:
Consistency is Your Friend: Use the same fonts, colors, and button styles everywhere. This makes your app feel predictable and polished.
Embrace White Space: Don't be afraid of empty areas on the screen. Negative space gives your content room to breathe and helps users focus on what's important.
Create a Clear Visual Hierarchy: Guide the user's eye with size, color, and placement. A big, brightly colored "Get Started" button is impossible to miss for a reason.
Design for Thumbs: Remember, people are tapping away with their thumbs. Place your most important actions in easy-to-reach zones, usually near the bottom and center of the screen.
By focusing on these practical steps, you build an app that doesn't just function correctly but feels intuitive and professional. This thoughtful approach to design is a non-negotiable part of creating an app without code, and it's what separates a quick experiment from a product people actually want to keep on their phones.
Building Your App's Core Features and Logic

This is where the magic happens. Your app is about to transform from a set of static screens into a living, breathing product. You're shifting gears from how it looks to how it works. It's all about setting up a database to manage your information and then building the "if this, then that" rules that make the user experience feel alive and interactive.
Think of it like building a car. Your UI design was the chassis and the paint job. Now you're installing the engine, the transmission, and all the wiring that actually makes it drive.
Establishing Your App's Database
Every useful app needs a brain, a place to remember things. That brain is its database. Don't let the term scare you; a no-code database is basically a collection of smart, interconnected spreadsheets. It’s where you’ll store, organize, and link all of your app's crucial information.
Let's imagine we're building a simple booking app for a local yoga studio. The database needs to keep track of a few key things, which we'll organize into tables:
Users: This table holds a profile for every person who signs up, storing their name, email, and maybe their membership status.
Classes: Here, we'll list every yoga class offered, including details like its name ("Sunrise Vinyasa"), time, instructor, and how many spots are available.
Bookings: This is the glue that connects the other two. Each entry here links a specific user to a specific class, effectively reserving their mat.
Setting this up in a platform like CatDoes is a visual process. You create these tables and define what information goes into each one. The real power comes when you create relationships between them. For instance, you’d link the Bookings table to the Users table, making it easy to pull up a list of all the classes a single user has signed up for.
This data structure is the absolute backbone of your app. Get it right, and building new features becomes a breeze. Get it wrong, and you’ll run into constant headaches down the road. Take the time to map out how your information connects before you build too much on top of it.
Connecting Your UI to Your Data
Okay, your database is set up. Now it’s time to hook up your app's interface so it can actually display all that information. This is where your beautiful designs start to feel real. You’ll be linking elements on the screen directly to the data tables you just created.
Back to our yoga app. On the "Upcoming Classes" screen, you wouldn't just type in each class manually. That would be a nightmare to update. Instead, you'd drop in a repeating list element and give it a simple instruction: "Show me everything from the Classes table. For each class, display its name, time, and instructor."
Just like that, it's dynamic. Add a new class to your database, and it instantly appears on this screen in the app. The UI is just a window into your data. Of course, the connection goes both ways. When a user taps a "Book Now" button, you need to create a new entry in the Bookings table. And that brings us to the logic.
Crafting No-Code Workflows and Logic
Workflows are the series of actions that happen in your app, usually kicked off by something a user does. They are the true engine of your app's functionality, dictating what happens when someone taps a button, submits a form, or swipes a card. No-code builders let you assemble these sequences visually, like building with LEGO blocks.
The user signup process is a perfect example. The workflow might look something like this:
Trigger: User clicks the "Sign Up" button.
Action 1: Take the email and password from the form and create a new record in the
Userstable.Action 2: Immediately log that new user into the app.
Action 3: Send a welcome email to the address they provided.
Action 4: Navigate the user to the main dashboard screen.
Each of these steps is just a simple, configurable block in the visual editor. You’re programming without touching a single line of code. You're just describing the outcome you want in a logical, step-by-step sequence. For our yoga app, tapping "Book Now" would trigger a workflow that creates a new record in the Bookings table, linking the current user to that specific class. This is how you build a real app without coding: by translating your ideas into visual instructions that the platform executes for you.
Launching and Growing Your No-Code App
You’ve designed the interface, wired up the logic, and connected the database. Your app actually works. That’s a huge milestone, but the journey doesn't stop here. The final leg of the race is all about testing, launching, and, most importantly, getting your app into the hands of real users.
This is where your project shifts from a personal build to a public product. It's about polishing the rough edges, navigating the app stores, and kicking off the cycle of feedback and improvement that defines every successful app.
A Practical Approach to Pre-Launch Testing
Before you unleash your app on the world, you have to find the bugs before your users do. A solid testing phase is non-negotiable, but it doesn't need to be a massive, formal affair. The goal is simple: catch critical errors, get honest feedback on the user experience, and make sure everything works the way you planned.
Start by pulling together a small, trusted group of beta testers. This could be friends, family, or a handful of people you know from your target audience. Give them specific tasks to complete, like signing up, creating a post, or running through the checkout process.
Your first users are your most valuable source of feedback. They will use your app in ways you never imagined, revealing confusing workflows, hidden bugs, and brilliant ideas for improvement. Listen intently, and thank them for their time.
Ask them to "think aloud" as they navigate the app and take detailed notes. This process will almost always uncover friction points you've become blind to during the build. Use that raw feedback to make targeted fixes, refining the experience until it’s smooth and intuitive for someone seeing it for the first time.
Submitting to the App Stores
With a polished and tested app in hand, you're ready for the main event: publishing to the Apple App Store and Google Play Store. This part can feel intimidating, but no-code platforms like CatDoes often handle the heavy lifting of packaging the app, leaving you to focus on the submission itself.
Each store has its own rulebook, but they both care about a few key things:
App Store Metadata: This is your app's name, a compelling description, keywords that help people find you, and your privacy policy.
Screenshots and Previews: High-quality visuals are non-negotiable. Create screenshots that clearly show off your app's key features and why someone should download it.
App Icon: This is your app’s first impression. Design something simple, memorable, and instantly recognizable.
Developer Accounts: You'll need to register for a developer account with both Apple ($99/year) and Google ($25 one-time fee) to submit your apps.
Brace yourself for the review process. Apple's review, in particular, is notoriously thorough and can take several days. They check for bugs, guideline violations, and overall quality. Don't be discouraged if you get rejected; it happens to everyone. They always provide feedback, so you can fix the issues and resubmit.
Your First Steps in App Marketing and Growth
Getting your app live in the stores is a huge win, but it’s just the starting line. Now, you need people to actually download and use it. Once your no-code app is built and ready, ensuring its success requires effective promotion; explore various proven mobile app marketing strategies to reach your target audience and boost engagement.
Start with the simple stuff you can manage yourself. Announce the launch on your social media channels, email your personal network, and post in relevant online communities or forums. Your earliest traction will almost always come from these direct, grassroots efforts.
As users start trickling in, analytics and feedback become your new best friends. Most no-code platforms have built-in analytics or integrate easily with tools that track user behavior. You’ll want to keep a close eye on a few key metrics:
User Retention: What percentage of users come back after day one? Week one? Month one?
Session Length: How much time are people spending in your app when they open it?
Feature Usage: Which features are people using the most? Which ones are being ignored?
This data, combined with direct user feedback from app reviews and support emails, creates a powerful roadmap for your future updates. The growth of your app is a continuous loop: launch, listen, and iterate. It’s this cycle that ensures your app doesn't just launch, it thrives.
Your Top No-Code App Building Questions, Answered
As you get ready to jump in and build your app, it’s natural for a few questions to pop up. Getting these sorted out early helps you set the right expectations and move forward with a clear head.
Here are the answers to the most common questions we hear from founders and creators just starting out.
How Much Does It Really Cost To Build an App Without Code?
This is usually the first question on everyone's mind, and the honest answer is: it depends on your app's complexity and the platform you pick. The good news is that most no-code tools, including ours, offer free plans. These are perfect for getting your hands dirty, learning the ropes, and even building out a functional first version of your app.
When you’re ready to launch to the public, paid plans typically kick in around $20 to $50 per month. For more ambitious apps that need to handle thousands of users, store a lot of data, or use advanced features, you might see costs ranging from $100 to over $500 per month.
My advice? Always map out your must-have features first, then look at the pricing tiers of a few platforms to see where your project fits.
Can I Actually Build a Scalable Business on a No-Code App?
Absolutely. The old idea that no-code is just for hobby projects or simple prototypes is completely outdated. We're seeing successful startups and even established companies running their entire businesses on apps built with powerful no-code platforms.
Tools like Bubble, Adalo, and our own platform, CatDoes, are engineered for growth. They are designed to handle thousands of active users and complex backend operations, allowing your app to scale seamlessly as your user base expands. The key is to select the right tool from the start.
You can genuinely build a million-dollar business on a no-code foundation today. The tech is there.
What Are the Real Limitations of No-Code App Builders?
While no-code is incredibly powerful, it's not magic. It's important to know the boundaries. You might hit a wall if your vision requires a highly specific, custom-animated user interface that goes far beyond the standard components a platform offers.
Performance-heavy apps are also generally out of scope. Think high-frequency trading platforms or graphically intense 3D games, those still belong in the world of custom code.
Similarly, accessing very specific native phone hardware, like the accelerometer or barometer, can sometimes be a challenge. But for the vast majority of business, social, and utility apps people want to build, no-code platforms are more than capable of delivering a polished, professional product.
Ready to turn your idea into a real app, faster than you ever thought possible? With CatDoes, our AI-native platform handles the complex parts of app creation, from design to database setup and app store submission. Start building for free and see your vision come to life. Discover more at https://catdoes.com.
Nafis Amiri
Co-Founder of CatDoes


