Blog
Tutorials
How to Publish an App on Google Play (2026)
Learn how to publish an app on Google Play in 2026. Step-by-step guide: developer account, signed AAB, store listing, testing tracks, staged rollout.

Nafis Amiri
Co-Founder of CatDoes

TL;DR
Create a Google Play Developer account ($25 one-time fee) and confirm your app's permanent Application ID in CatDoes.
Use the CatDoes build agent to generate a signed Android App Bundle (AAB) and enroll in Play App Signing.
Build a store listing with a 30-char title, 80-char short description, 4,000-char full description, app icon (512x512), feature graphic (1024x500), and 2-8 screenshots.
Test with Internal (up to 100 testers), Closed, and Open tracks before promoting to production via a staged rollout (1-5% first).
New-developer review takes 3-7 days; established accounts usually see updates live in under 24 hours.
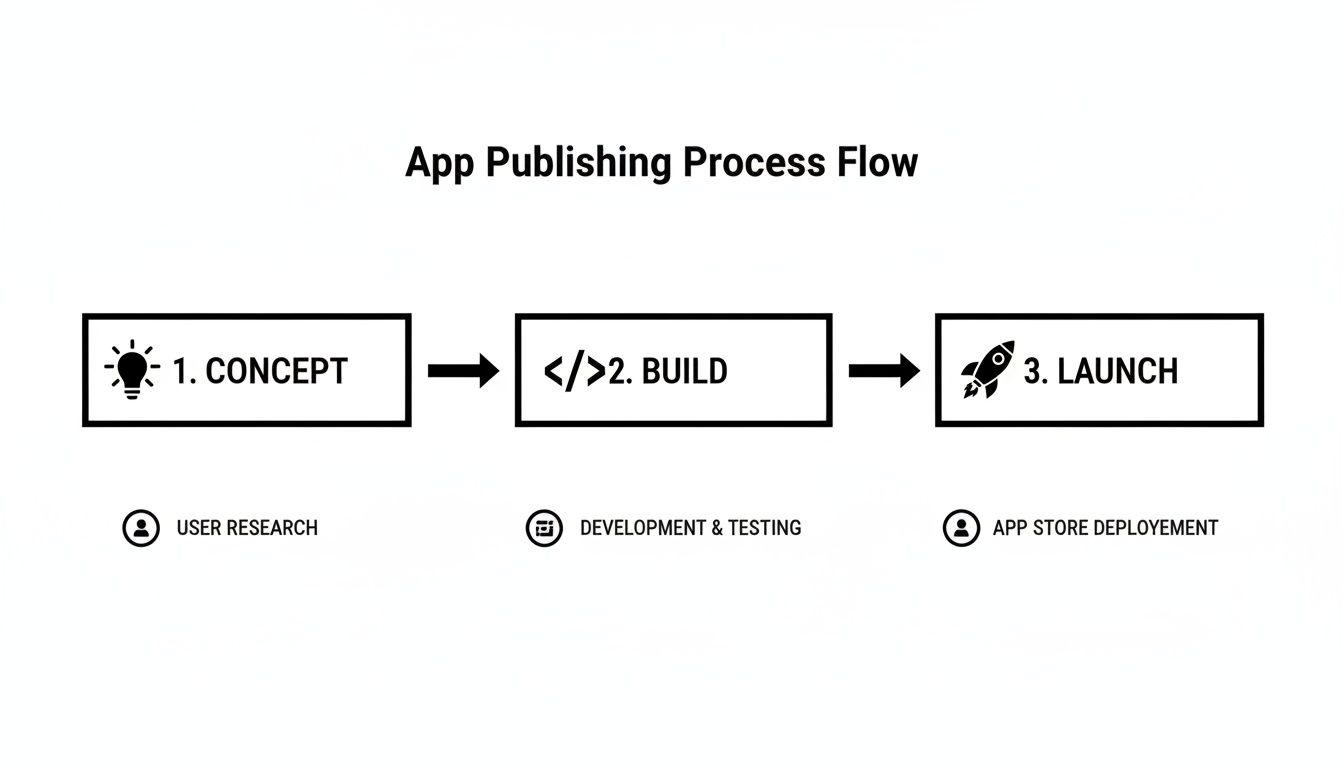
Knowing how to publish an app on Google Play is the difference between a project that ships and one that stays on your laptop. The process has four milestones: a verified developer account, a signed Android App Bundle, a store listing that actually converts, and a controlled release through Google's testing tracks.
The opportunity is real. As of January 2026, the Play Store hosts around 2.06 million apps, an average of 1,205 new apps launch every day, and total downloads are projected to hit 143 billion by 2026. But in February 2026 alone, 42,500 new apps launched and 13,600 were removed, so quality matters more than ever. You can check the live numbers on 42matters.
Watch: Mitch Koko's 10-minute walkthrough of the Google Play publishing flow, covering Play Console setup, signed app bundle upload, store listing, and your first release. Use it as a visual companion alongside the written steps below.
Cost and Timeline at a Glance
What You Pay | How Long It Takes | What You Need |
|---|---|---|
$25 one-time developer fee | 1-2 hours initial setup | Government-issued ID for verification |
15-30% Google commission on paid features (only if monetizing) | 3-7 days first-time review | Signed AAB from CatDoes |
$0 per listing or update | Under 24 hours for subsequent updates | Privacy policy hosted on a public URL |
14 days closed testing for new personal accounts | Store listing assets (icon, screenshots, feature graphic) |
Table of Contents
Setting Up Your Google Play Developer Account
Building and Signing Your App with CatDoes
Creating a Google Play Store Listing That Converts
Testing Your App Before Launch
Common Reasons Google Play Rejects Apps
Pre-Publish Checklist
Frequently Asked Questions
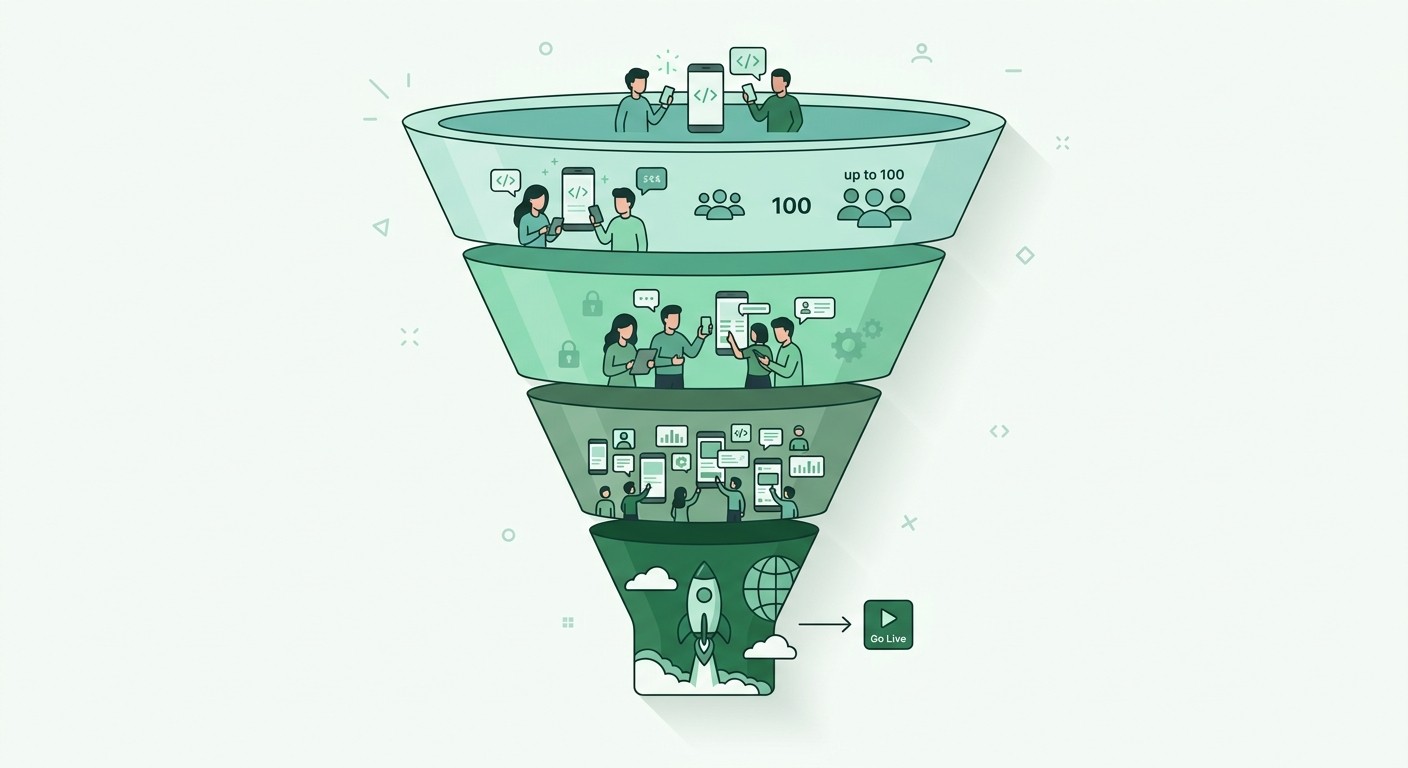
Your Google Play Publishing Roadmap
Before the step-by-step, here's the high-level checklist. Each stage builds on the one before it.
Milestone | Key Action | CatDoes Advantage |
|---|---|---|
Account & Asset Prep | Create a Google Play Developer account and prepare your app's visual assets and text. | CatDoes guides you on asset requirements, so you're ready from day one. |
Build & Sign | Generate a production-ready Android App Bundle (AAB) file. | The CatDoes release agent automates the build and signing process. |
Play Console Setup | Create your store listing, set up content ratings, and add your privacy policy. | Clear instructions and links demystify Google's dashboard. |
Test & Release | Use internal, closed, or open testing tracks to get feedback before a full rollout. | Launch with confidence after validating your app with real users on real devices. |
Setting Up Your Google Play Developer Account
Publishing starts with a Google Play Developer account. You'll need a Google Account and a one-time $25 registration fee. This single fee gives you access to an audience of over 2.5 billion monthly active users.
Once you're in, the Play Console becomes your command center for every app you publish. This is where you'll upload your AAB, write your store listing, manage testers, and push releases.

Google requires identity verification for every new developer. Have a government ID ready, use your legal name, and double-check every field. Mismatches between your ID and your account details are the most common reason verification gets stuck for weeks.
Configuring Your App in CatDoes
With the account active, pop back into your CatDoes project and confirm your app metadata. The most important field is the Application ID (the package name). This is your app's permanent fingerprint on the Play Store and every Android device. Once you publish an app with a specific Application ID, you can never change it.
Application IDs use reverse-domain format, like com.yourcompany.yourapp. CatDoes prompts you to set this early on, but now is the time to confirm it's what you want for the long run.
You'll also manage two version numbers:
Version Code: An internal whole number (1, 2, 3...). You must increment it with every update.
Version Name: The public-facing version users see, like "1.0" or "2.1.3".
Your Privacy Policy (Non-Negotiable)
If your app collects or handles any personal or sensitive user data, a privacy policy is mandatory. This includes:
Names and email addresses
Location data
User contacts or call logs
Device identifiers
Any modern app using authentication or data storage, including CatDoes Cloud, will handle some user data. Host your policy at a public URL (a simple webpage, GitHub Pages, or a policy generator) and add the URL to your store listing. Missing or broken privacy policy links are one of the top three rejection reasons.
Building and Signing Your App with CatDoes
With the account ready, you need a file Google can accept. For the Play Store, that file is an Android App Bundle (AAB), and it has to be cryptographically signed to prove it came from you. The CatDoes build-and-release agent handles both steps.
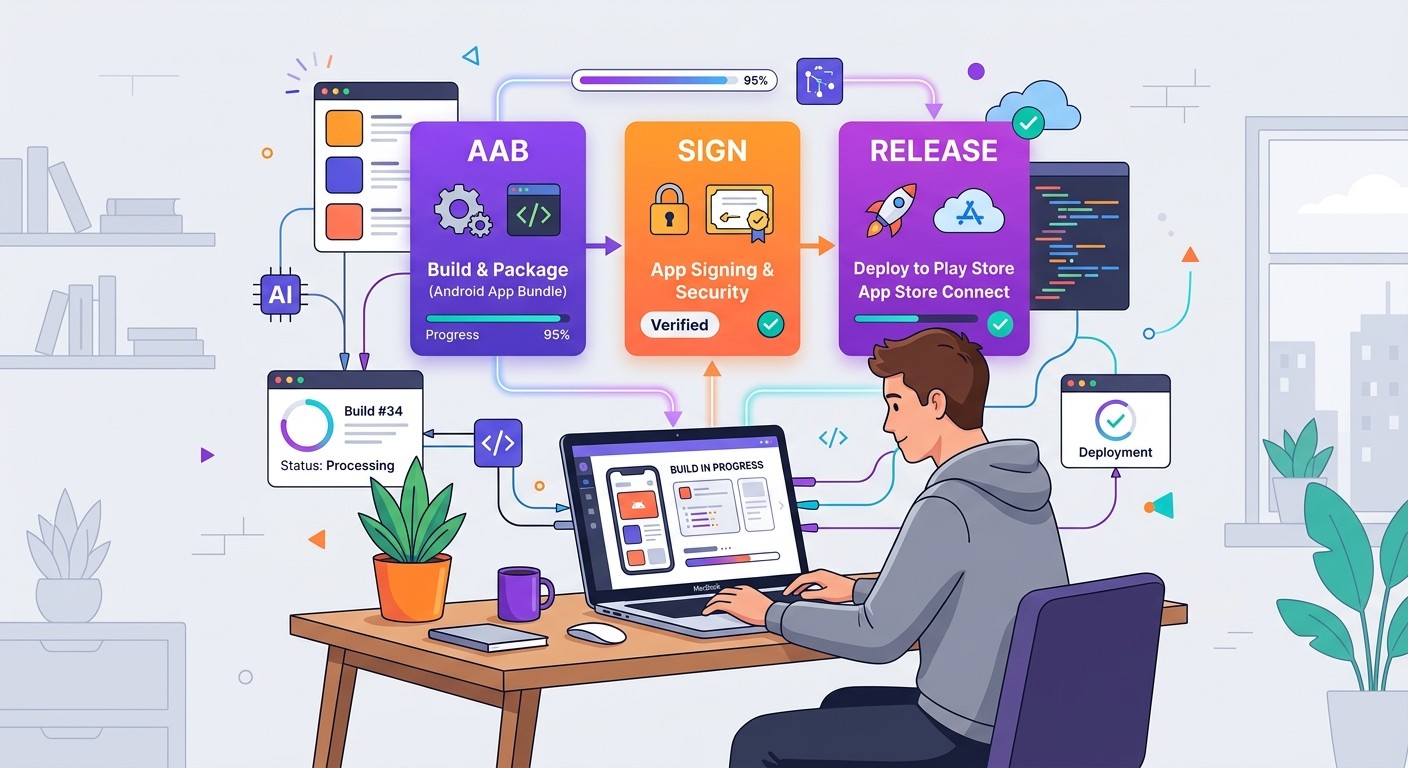
Behind the scenes, the agent compiles your project, bundles resources, generates or reuses your upload key, and produces a signed AAB ready to upload to the Play Console.
Generating Your Android App Bundle
Inside your CatDoes project, open the build-and-release agent, pick "Android App Bundle," and run the build. The AAB format has three advantages over legacy APKs:
Smaller downloads: Google serves optimized APKs per device, shrinking downloads by 15-20% on average.
One upload: A single AAB covers every device, screen density, and language.
Future-proof: AAB is Google's required format for new apps and unlocks modern features like dynamic delivery.
For a closer look at the internals, see the CatDoes build and release workflow.
Understanding App Signing
App signing is how Google verifies that updates to your app come from you and haven't been tampered with. CatDoes generates a unique upload key the first time you build a release AAB, and that key signs the bundle before it leaves your machine.
When you upload to Google Play, enroll in Play App Signing. Google re-signs your AAB with a Google-managed app signing key and uses that final key on every APK delivered to users.
Play App Signing is the safer default. If you lose your CatDoes upload key, Google can reset it. If you manage your own app signing key and lose it, you can never update your app again. You'd have to publish a brand new listing.
Enrollment is a one-time setup during your first release in the Play Console. After that, every AAB you build in CatDoes is ready to upload.
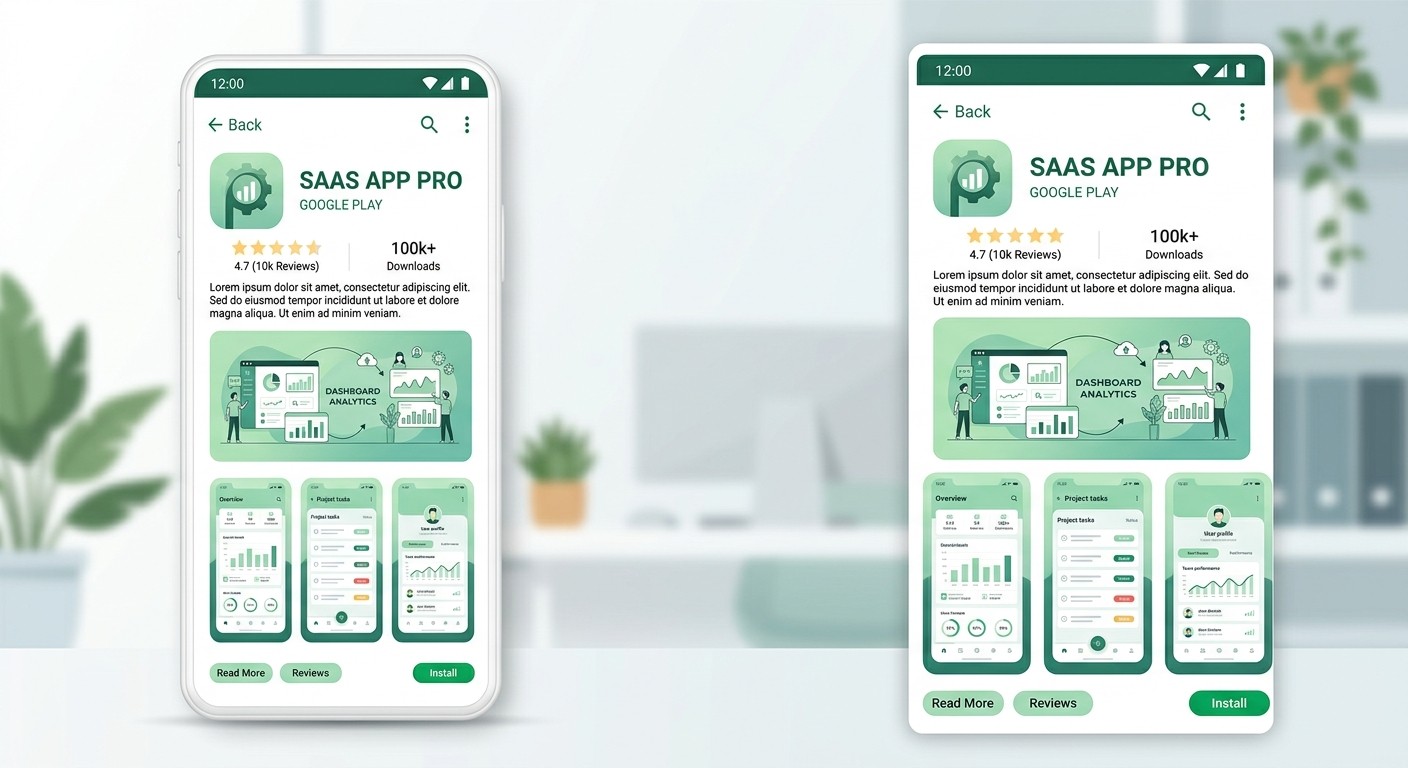
Creating a Google Play Store Listing That Converts
A Google Play store listing has five required pieces: an app title (30 characters), a short description (80 characters), a full description (4,000 characters), an app icon (512x512), and a feature graphic (1024x500), plus 2-8 screenshots. You build all of it inside the Google Play Console, and it's the one chance to turn a browser into a download.
Crafting Compelling Text Content
Your title and descriptions are your marketing copy. Keep them clear, keyword-rich, and honest.
App Title (30 chars): Memorable and descriptive. "Chirp" is okay; "Chirp: Team Chat" is stronger because it adds context plus a keyword.
Short Description (80 chars): Your one-line pitch, shown right below the title. Lead with the biggest benefit or problem you solve.
Full Description (4,000 chars): Use short paragraphs and bullet points. Weave in keywords naturally. Walls of text get skipped.
For a deeper breakdown of keyword and conversion tactics, see our guide on app store optimization tips.
Designing High-Quality Graphic Assets
Your graphic assets signal quality faster than any text ever will.
The app icon is the single most important visual. It appears on the store, the home screen, and in notifications. Keep it simple, recognizable at 48x48, and readable on any background.
Your screenshots tell a visual story. Don't just dump UI screens. Walk users through the core value: welcome screen, feature in action, end result. Add short caption overlays on each screenshot to explain the benefit.
The feature graphic is the billboard at the top of your listing. Use bold branding and keep text away from the edges, since crops happen on some devices.
Store Listing Asset Checklist
Asset | Specs | Pro Tip |
|---|---|---|
App Icon | 512 x 512 px, 32-bit PNG | Avoid text. Test on multiple background colors. |
Feature Graphic | 1024 x 500 px, JPG or 24-bit PNG | Keep key info away from the edges to survive crops. |
Screenshots | 2 to 8 per device type | Add captions. Tell a story, not a feature list. |
Short Description | Up to 80 characters | Lead with the main benefit. |
Full Description | Up to 4,000 characters | Bullets and short paragraphs. Weave in keywords. |
Categorizing Your App and Content Rating
Pick an app category (Productivity, Health & Fitness, etc.) and add up to five tags that match what your app actually does. Accurate tags help Google's algorithm surface your app to the right audience.
Complete the content rating questionnaire honestly. Misrepresenting content here gets apps suspended, even after a successful launch. The questionnaire takes five minutes and prevents a lot of pain later.
Setting Up In-App Purchases and Subscriptions
If your app monetizes through digital goods, subscriptions, or premium features, you need to configure Google Play Billing before launch. Google takes a 15% commission on the first $1M in annual revenue per developer, then 30% beyond that. For qualifying subscriptions, the commission drops to 15% after the first year.
Three product types to know:
One-time products: Non-consumable (unlock a feature forever) or consumable (credits, coins, premium replies).
Subscriptions: Recurring billing with free trials, introductory pricing, and grace periods baked in.
Rewarded products: Users earn credits by watching ads, typically used in games.
Create each product inside Monetize > Products in the Play Console, then wire the Play Billing Library into your CatDoes project. Test every purchase path in the internal testing track with license tester accounts before going live. A broken checkout flow at launch is one of the fastest ways to rack up one-star reviews.
Testing Your App Before Launch
Google Play gives you three testing tracks before production: internal (up to 100 testers, builds live in minutes), closed (controlled tester lists, required for 14 days on new personal accounts), and open (public beta on your listing). Use them in that order. Hitting "publish" feels final, and pushing a buggy release triggers one-star reviews and uninstalls that are hard to undo, so these tracks are the quality gate between a CatDoes build and a production release.
Using the Internal Testing Track
The internal testing track is your first stop. You can add up to 100 testers by Gmail address, and once they opt in, they install your app like any other Play Store download. New builds typically reach testers within minutes.
Internal testing is good for:
Rapid QA: Your team hunts for show-stopping bugs on real hardware.
Smoke testing: Confirms core flows still work after each update.
Direct feedback: Honest comments without the noise of public reviews.
Closed and Open Testing
Closed testing widens the circle to a larger controlled group. You create tester lists and share an email or private opt-in link. Good for private betas with early customers or paid user research groups.
Personal developer accounts created after November 13, 2023 must complete 14 consecutive days of closed testing with at least 12-20 testers before being eligible for production. Plan your launch at least three weeks out to absorb this waiting period.
Open testing makes your beta visible on your public Play Store listing. Anyone can join, which stress-tests your backend at scale. This is especially useful if you're running CatDoes Cloud, where you want real production-like load before a 100% rollout. Our guide on mobile app testing challenges covers what to watch for in this stage.
Staged Rollout to Production
Once testing looks clean, promote the build from a testing track to production. You don't re-upload the AAB. Google carries the existing build into the production release.
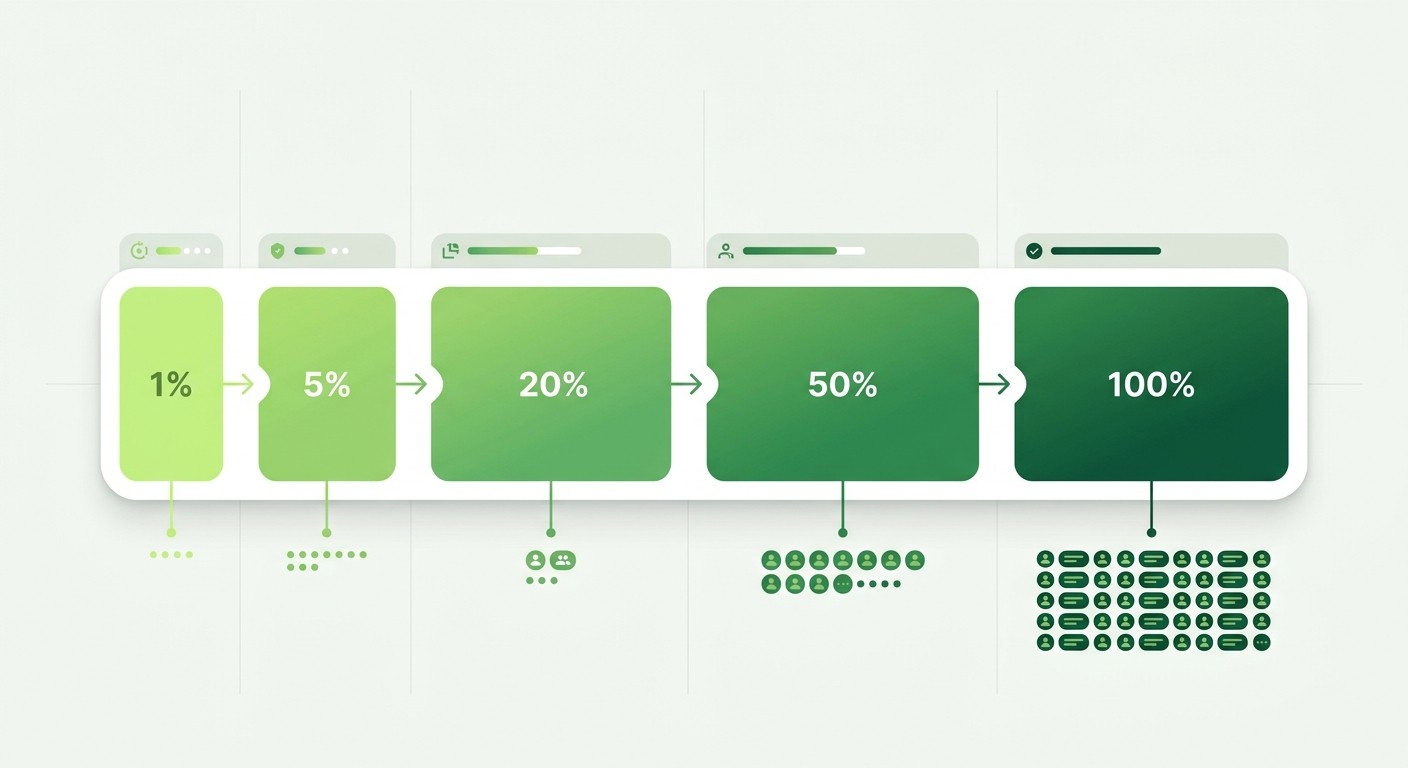
Don't release to 100% of users on day one. Use a staged rollout instead. Start at 1-5%, watch Android Vitals in the Play Console for crashes and ANRs, and gradually increase the percentage. Google's "bad behavior thresholds" are a 1.09% user-perceived crash rate and a 0.47% ANR rate. Cross either threshold and Google may demote your app in search and recommendations. A staged rollout is the last safety net before a wide issue hits your rating.
Common Reasons Google Play Rejects Apps
Most rejections come from the same handful of policy gaps. Fix these before you submit and you skip a week of back-and-forth with the review team. Every rule below comes from Google's Developer Program Policies.
Misleading metadata. Your title, description, or screenshots claim features the app doesn't actually deliver. Fix: Every claim in your listing must match a real flow inside the app. Screenshot only real UI, not marketing comps.
Crashes or broken core flows. Reviewers test the main features on a real device and any crash is an instant rejection. Fix: Run the app through internal and closed testing first, fix everything on the Android Vitals dashboard, and never submit a build that crashes on launch.
Missing or vague privacy policy. If your app touches any user data and you don't link to a live privacy policy, the review team rejects automatically. Fix: Host a real policy at a public URL, link it inside the app and in the store listing, and keep it current when data handling changes.
Incomplete store listing. Placeholder text, blurry screenshots, or missing feature graphics signal a low-quality submission. Fix: Fill every field before hitting submit. Export screenshots at full resolution and proofread every paragraph.
Unlicensed content. Copyrighted icons, images, music, or fonts without a license get flagged fast. Fix: Use licensed stock, original assets from CatDoes, or clearly permissive sources. Keep proof of license in case of disputes.
Permissions without justification. Requesting sensitive permissions (location, contacts, SMS) with no clear in-app reason triggers a policy review. Fix: Only request what you use, and declare the purpose in the Play Console data safety form.
Inaccurate content rating. Under-rating mature content or skipping the rating questionnaire gets apps suspended post-launch. Fix: Answer the questionnaire honestly the first time. Re-take it whenever your content changes.
Pre-Publish Checklist
Run through this list before you hit submit. Every item is either a rejection risk or a conversion risk.
Account and build
Google Play Developer account verified with a government ID
Two-step verification enabled on the Google account
Application ID final (you cannot change it after publishing)
Version Code incremented; Version Name updated for users
Signed Android App Bundle generated via CatDoes and enrolled in Play App Signing
Store listing
App title under 30 characters, short description under 80, full description proofread
App icon (512x512 PNG), feature graphic (1024x500), 2-8 screenshots per device type
Category and up to 5 tags that match what the app actually does
Content rating questionnaire completed honestly
Privacy policy live at a public URL and linked in the listing
Testing and release
Internal testing with your team green on core flows
Closed testing with 12-20 real testers for 14 days (if you are a personal account created after November 2023)
In-app purchases and subscriptions tested with license tester accounts
Data safety form filled out and matches the permissions in the manifest
Staged rollout set to 1-5% on day one, with Android Vitals monitoring active
Frequently Asked Questions
How Much Does It Cost to Publish an App on Google Play in 2026?
Publishing on Google Play costs a one-time $25 registration fee in 2026, paid once when you create your developer account. There is no annual renewal and no charge per app, per listing, or per update. The only other cost is Google's commission on in-app purchases and subscriptions: 15% on your first $1M in annual revenue and 30% above that, and that applies only if you sell digital goods. A free app with no in-app purchases costs nothing beyond the initial $25.
What Are the Requirements to Publish an Android App in 2026?
To publish an Android app on Google Play in 2026 you need seven things: a verified Google Play Developer account ($25, with government-ID verification), a signed Android App Bundle (AAB) enrolled in Play App Signing, a complete store listing (512x512 icon, 1024x500 feature graphic, 2-8 screenshots), a privacy policy hosted at a public URL, a completed content rating questionnaire, a filled-out data safety form, and an app that targets a recent Android API level. Personal developer accounts created after November 13, 2023 must also complete 14 consecutive days of closed testing with 12-20 testers before they can release to production.
How Long Does Google Take to Approve My App?
For a first-time developer, review takes 3 to 7 days on average, sometimes longer if identity verification stalls. Established accounts usually see updates approved in under 24 hours. Google combines automated checks with human reviewers, so a complete listing, a linked privacy policy, and stable builds from testing tracks speed things up.
My App Was Rejected. Now What?
Don't panic. Rejections are feedback, not verdicts. Read Google's email carefully; it names the specific policy. Then open the Policy status page in the Play Console for more context and rule links. Fix the issue in CatDoes, bump the version code, and create a new release. Add a short note in the release details explaining exactly what you changed. Reviewers appreciate the context and tend to move faster on resubmissions that acknowledge the original feedback.
How Do I Update My App After It's Live?
Make your changes in CatDoes. Before the build, increment the versionCode (the internal number Google uses to detect a new version) and optionally update the versionName (the public "1.2" string users see). Generate a new signed AAB via the build-and-release agent, create a new release in the Play Console, upload the AAB, and write release notes. Push to everyone or use a staged rollout, then watch Android Vitals for any regressions in the first 48 hours.
Do I Really Need a 14-Day Closed Test?
Only if your personal developer account was created after November 13, 2023. In that case, Google requires 14 consecutive days of closed testing with at least 12 testers opted in before you can access production. Organization accounts and older personal accounts are exempt. Plan your launch three weeks in advance so the clock runs while you polish the store listing.
Start building your app free with CatDoes and ship your first Android release this month.
Nafis Amiri
Co-Founder of CatDoes


