
Blog
Tutorials
How to Get an App Developed A Founder's Guide
Learn how to get an app developed from concept to launch. Our founder's guide covers planning, costs, hiring developers, and post-launch growth.

Nafis Amiri
Co-Founder of CatDoes

Every great app starts as a simple idea, but turning that spark into a successful product is a deliberate journey. It's a path that begins long before a single line of code gets written, focusing first on a solid strategic foundation.
This field is buzzing with opportunity. By 2025, the global mobile app industry is expected to hit a staggering $673 billion, a figure larger than the economies of some countries. And it's not slowing down. With a projected compound annual growth rate of 21.55%, the market is on track to cross $1 trillion by 2034, showing just how much room there is for new, valuable apps.
The first phase is all about strategy and validation. You have to be sure that people actually want and need what you're planning to build. So many founders skip this step, and it's one of the biggest reasons new apps fail. It’s not enough to have a cool idea; you need a cool idea that solves a real problem for a specific group of people.
To give you a better sense of the entire journey from start to finish, here’s a quick roadmap.
Quick Overview of the App Development Lifecycle
Phase | Key Objective | Typical Duration |
|---|---|---|
Strategy & Research | Validate the idea, define the target user, and analyze the market. | 2-4 weeks |
Design & Prototyping | Create wireframes, mockups, and an interactive prototype. | 3-6 weeks |
Development | Build the core features for the Minimum Viable Product (MVP). | 8-16 weeks |
Testing & QA | Find and fix bugs, ensure stability, and gather initial feedback. | 2-4 weeks |
Launch & Marketing | Submit to app stores and execute the go-to-market plan. | 1-2 weeks |
Post-Launch | Monitor performance, gather user data, and plan future updates. | Ongoing |
This table provides a high-level look, but remember that the first phase, Strategy & Research, is where you set the entire project up for success.
Define Your Idea and Target User
The first real step is to move from a vague concept to a concrete plan. Start by writing down the exact problem your app solves. Then, ask yourself: who am I solving it for? This is where creating a user persona becomes essential. A user persona isn't just a demographic; it's a detailed profile of your ideal customer.
For example, if you're building a meal-planning app, your persona might be "Busy Brian," a 35-year-old working parent who struggles to find time for healthy cooking. This simple profile instantly becomes your guide for every decision, from which features to build first to how you'll market the app.
A well-defined user persona is your north star. It ensures you’re not building an app for everyone, which often means you end up building it for no one. Instead, you create a focused solution that truly connects with a specific group.
This simple flow chart illustrates how you move from a raw idea to a user-focused concept.
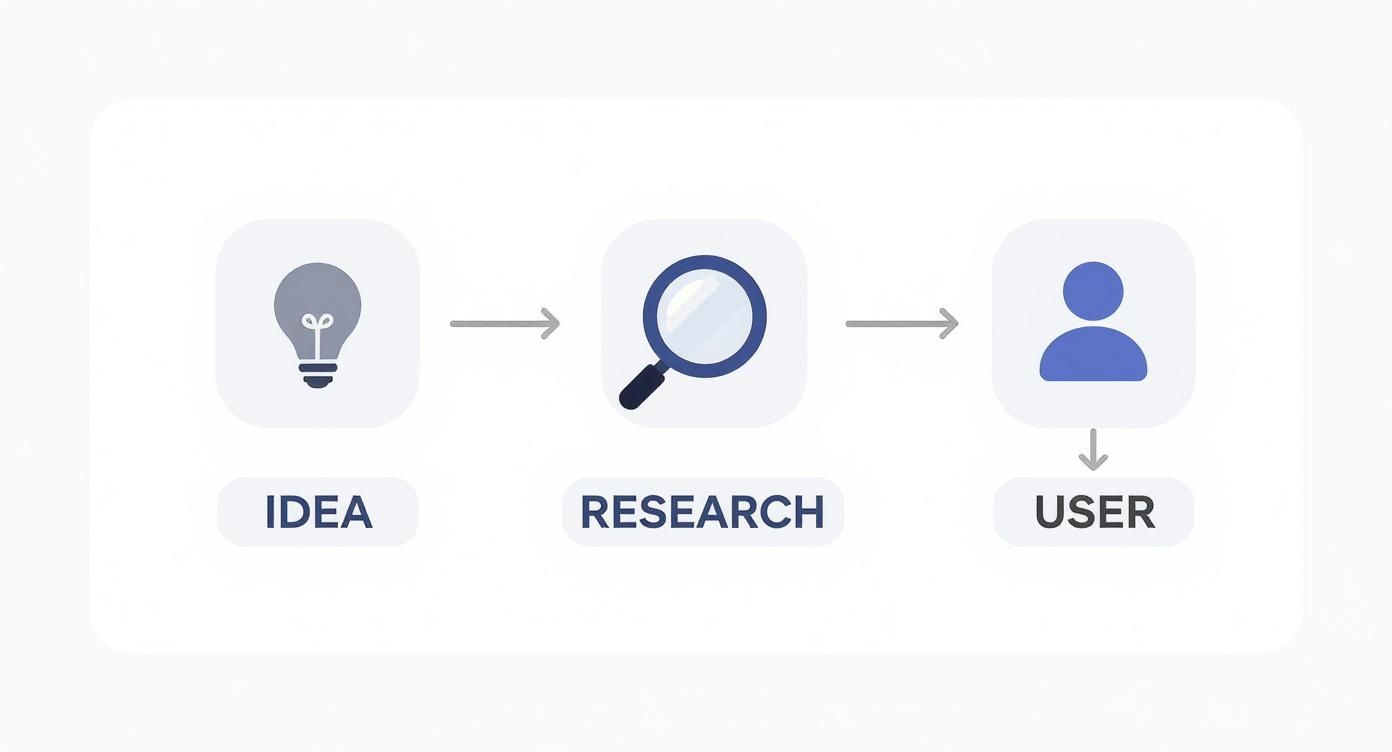
As you can see, research and user definition are the critical bridges that connect your initial thought to a viable product plan.
Validate Your Concept with Market Research
Once you know your idea and your user, it's time for a reality check. You need proof that your app actually has a place in the market. This comes down to two key activities:
Competitor Analysis: Find the existing apps in your niche. Dig into their features, pricing, and user reviews. What do people love about them? More importantly, what are the common complaints? These gaps are your opportunities.
User Validation: Get out and talk to your target audience. You don't need a huge budget for this. Surveys, one-on-one interviews, or even casual focus groups can give you priceless feedback on your concept before you've invested heavily.
This groundwork helps you craft a unique value proposition that stands out. It also sets you up perfectly to define a Minimum Viable Product (MVP), a core concept we dive into in our guide on what a Minimum Viable Product is.
And as you get serious about building your app, it's also a good time to think about the business side of things, like understanding the process for incorporating a business in Canada to get your legal structure in place.
Choosing Your Development Team and Tech

You’ve validated your idea and you know exactly who you’re building for. Now comes the big decision: who is actually going to build this thing, and what tools will they use? This choice is a major fork in the road, directly impacting your budget, timeline, and how much control you have day-to-day.
Most founders head down one of three paths, each with its own very real pros and cons. Let's dig into what it’s actually like to hire freelancers, partner with an agency, or use one of the newer AI-native platforms.
Hiring Freelance Developers
Going the freelance route gives you a ton of flexibility and can definitely be easier on the wallet. You can scout a global talent pool and hand-pick specialists for iOS, Android, or your backend. It’s like assembling your own dream team.
The big trade-off? You are the project manager. Full stop. All the coordination, timeline management, and quality control lands squarely on your shoulders. Finding, vetting, and then managing a group of individuals is a massive time sink, and it’s a job in itself.
If you go this route, you have to be disciplined:
Vet Them Properly: Go way beyond their resume. Scour their portfolios, actually call their references, and give them a small, paid test project. You'll learn more from that one task about their skills and communication than from a dozen interviews.
Over-Communicate: Set up daily or weekly check-ins and live in a project management tool. When you're working with a remote team, miscommunication isn't a risk; it's an inevitability you have to manage.
Milestones Are Your Friend: Structure the contract around clear deliverables. Tie payments directly to completed work. It keeps everyone honest and motivated.
Partnering with a Development Agency
An agency is the more "all-in-one" package. You get a ready-made team of project managers, designers, developers, and QA testers, all under one roof. This setup takes the huge burden of team management off your plate so you can focus on strategy and the business itself.
Agencies have seen it all before. They bring battle-tested processes and experience from dozens of other projects, which usually means a smoother ride and a more polished final app. But that experience comes at a price. They're almost always the most expensive option, and you might trade some flexibility for their standardized workflows.
Look for a partner, not just a vendor. A great agency will push back on your ideas, offer strategic advice you hadn't considered, and be brutally honest about costs and timelines. Their success should be tied to your app's success, not just cashing your check.
Using No-Code or AI-Native Platforms
A third option has exploded in popularity, especially for non-technical founders or anyone who needs to launch fast. No-code and AI-native platforms let you build a real, functional app without writing a line of code. You use visual drag-and-drop editors or, even simpler, just describe what you want in plain English.
Platforms like CatDoes are built to crush the traditional development timeline. Instead of you managing people, you manage the AI. You explain your vision, and the platform generates the user interface, writes the code, and even configures the backend database for you. This is, without a doubt, the fastest way to get a Minimum Viable Product (MVP) into the hands of real users.
The speed and cost savings are the killer features here. A project that would take a traditional team months can often be done in weeks, sometimes even days. While you might hit limitations on super-niche or incredibly complex features, these platforms are getting more powerful by the day and are a perfect fit for a huge range of apps.
Choosing Your Tech Stack
While you're figuring out your "who," you also need to decide on the "what." The biggest technical decision you’ll face is whether to build a native app or go cross-platform.
Native Apps: These are built specifically for a single operating system, either iOS or Android. They give you the absolute best performance and full access to every feature of the phone. The catch is that you need two separate codebases, which means double the work and double the cost.
Cross-Platform Apps: Built with frameworks like React Native or Flutter, these apps use a single codebase that works on both iOS and Android. It’s far more efficient and budget-friendly. We break down the top options in our guide to cross-platform mobile development tools.
There’s no single right answer here. Your budget, how quickly you need to launch, your own technical comfort level, and your long-term vision will all point you toward the best path for turning your idea into a real app.
Designing an App People Actually Want to Use
Okay, you've decided how you're going to build your app. Now comes the fun part: figuring out what it will actually look, feel, and act like. This is where your big idea gets translated into screens, buttons, and flows. A killer concept can fall flat on its face if the experience is clunky, confusing, or just plain frustrating.
The goal is to create something that feels completely natural from the moment someone opens it. Every tap, every swipe, every screen should feel intuitive, guiding the user where they want to go without them even having to think about it. To pull this off, you first need to get inside your users' heads. It's why it's so critical to master the UX research process and let their needs drive every single design decision you make.
The Core Principles UI and UX Design
You’ll hear the terms UI and UX thrown around a lot, often together. But they're two very different things, and you need both to get your app right.
User Experience (UX) Design: This is all about the overall feeling a person gets when they use your app. It’s the logic, the structure, and the flow. Good UX answers questions like, "Can I find what I'm looking for easily?" or "Does this app solve my problem without making me jump through hoops?"
User Interface (UI) Design: This is the visual layer. UI covers all the stuff you see: the colors, fonts, icons, and spacing. It’s what makes an app look beautiful and helps visually communicate the structure that the UX designer mapped out.
Here’s an easy way to think about it: UX is the architectural blueprint for a house, defining the layout and how you move from room to room. UI is the interior design, like the paint colors, furniture, and lighting that bring that blueprint to life. One without the other just doesn't work.
From Idea to Interactive Blueprint
Before a single line of code gets written, you absolutely need a tangible plan. This is where wireframing and prototyping come in, and skipping these steps is one of the most expensive mistakes you can make. They allow you to test, iterate, and fix your app's flow before you've committed thousands of dollars to development.
A wireframe is the most basic, black-and-white sketch of your app's layout. Think of it as a schematic. It has zero visual design and focuses purely on structure, like where the buttons go, where the text sits, and how the screens connect.
A prototype is the next level up. It’s a clickable, interactive model of your app. While the backend isn't functional, it simulates the user journey perfectly. You and your team can actually tap through screens, test the navigation, and get a real feel for the product.
Prototyping is your secret weapon. Putting a clickable model in front of potential users is the fastest way to find out what's confusing or broken. You'll uncover usability issues you would have never seen on paper. This feedback loop is one of the single most cost-effective things you can do.
Prioritizing Features for Your MVP
One of the biggest traps founders fall into is trying to build every single feature they've ever dreamed of for version one. The key to a smart launch is defining a Minimum Viable Product (MVP).
The MVP isn’t a cheap or incomplete version of your app; it's the most focused version. It contains only the absolute essential features required to solve the core problem for your very first users. Anything else is noise.
To nail down your MVP, list every possible feature you can think of. Then, get ruthless and categorize them.
Priority Level | Description | Example (for a meal-planning app) |
|---|---|---|
Must-Have | Core features. Without these, the app is useless and doesn't solve the main problem. | User can search for recipes and add them to a weekly meal plan. |
Should-Have | Important features that add a lot of value but aren't critical for the first launch. | A grocery list is automatically generated based on the meal plan. |
Nice-to-Have | Cool ideas that don't address a core need. These are perfect for future updates. | Integration with smart fridges or a social feature for sharing recipes. |
Your MVP is built exclusively from that "Must-Have" list. This disciplined focus gets your app to market faster, keeps initial costs down, and most importantly lets you gather real data from actual users to decide what to build next. It's the smartest way to start.
Budgeting Your App Development Project
A great app idea is one thing, but figuring out the money and time it'll take to build it is what makes it real. Budgeting isn't just about pulling a number out of thin air; it’s about knowing what drives costs and how long things will actually take. Getting this right from the start is a massive step toward getting your app built successfully.
The final price tag on your app comes down to hours. The more complex the features, the more hours a developer or team needs to pour into it. This is exactly why a tightly focused Minimum Viable Product (MVP) is your best friend when you're starting out.

Key Factors That Influence Your App Budget
A few core decisions will have the biggest impact on what you end up spending. Each one is a classic trade-off between cost, speed, and how much you can build.
App Complexity: This is the big one. An app with simple features like static text and basic user forms will cost a fraction of one that needs real-time data syncing, user-generated content, and multiple third-party API integrations.
Platform Choice: Do you need to be on both iOS and Android from day one? Building a native app for both means paying for two separate codebases, which can nearly double your development costs. A cross-platform approach or even a Progressive Web App (PWA) can slash this expense.
Design Uniqueness: A slick, custom-animated user interface looks incredible, but it also requires far more design and development hours than a clean, functional design that uses standard, pre-built components.
And, of course, the development path you choose, whether agency, freelancers, or an AI-native platform, plays a huge role. An agency offers an all-in-one service but comes with a premium price tag. Freelancers give you flexibility for less money but require you to be much more hands-on with project management.
Realistic Cost and Timeline Estimates
So, what’s the real number? The honest answer is it depends. But we can look at some typical ranges to give you a solid starting point.
A simple utility app might land somewhere between $15,000 to $40,000 and take 2-4 months to build. If you're building something more complex with user profiles, payments, and a backend, you're likely looking at the $40,000 to $90,000 range with a 4-7 month timeline. For a large-scale application like a social network or a custom e-commerce platform, costs can easily rocket past $100,000 and take over 7 months to launch.
Want a deeper dive into the numbers? This complete mobile app development cost breakdown gets into the nitty-gritty.
Key takeaway: These aren't just one-time development costs. Your budget needs room for ongoing expenses like server hosting, maintenance, and bug fixes. Plan on adding another 15-20% of the initial development cost annually to keep your app running smoothly.
Mapping Out a Project Timeline
A realistic timeline is just as critical as a budget. It keeps everyone on the same page, helps you track progress, and lets you coordinate your launch marketing. Most projects follow a few key phases.
Discovery and Design (3-6 Weeks): This is where you lock in the scope, create wireframes, and build out the UI/UX prototype.
Development (8-16+ Weeks): The longest phase. This is where the code gets written, usually in 2-3 week "sprints," with each sprint delivering a new chunk of working features.
Testing and QA (2-4 Weeks): Time for some serious bug hunting. The app gets tested across different devices and networks to make sure it's stable and performs well.
Launch and Deployment (1-2 Weeks): Getting it out the door! This involves preparing app store listings, submitting for review, and finally, pushing it live.
To make this more concrete, here’s a quick comparison of how your development choice impacts the big three: cost, timeline, and your level of control.
App Development Options Comparison
Development Path | Typical Cost Range | Estimated Timeline | Your Level of Control |
|---|---|---|---|
Freelancers | Low to Medium | Varies Greatly | High |
Agency | High | Structured | Medium |
AI-Native Platform | Low | Very Fast | High |
Seeing these numbers and timelines laid out should demystify the process and help you build a financial plan that actually works. By carefully weighing complexity, platform choice, and your development partner, you can sidestep common financial traps and set your project up for a successful launch.
Turning Your Blueprint into a Real App
Alright, this is where the rubber meets the road. All those designs, wireframes, and plans are about to become a living, breathing product. The build phase is a flurry of activity where code gets written and your vision is assembled into a functional app that people can actually tap, swipe, and interact with.
It's a two-sided coin. You have the front-end, which is everything your user sees and touches, the beautiful interface you agonized over. Then there's the back-end, the engine room that handles all the data, logic, and server-side magic that makes the app work. Both have to be built in perfect sync to create that seamless experience you're aiming for.
Don't Skip the Most Important Step: Testing
Once you see a working version of your app, the temptation to just ship it is immense. I get it. But rushing to launch without a serious testing and Quality Assurance (QA) process is one of the most destructive mistakes you can make. A buggy, unstable app will torch your reputation before you even have one.
Think of rigorous testing as your safety net. It’s what catches the nasty bugs and frustrating glitches that would otherwise alienate your first users. This isn't just about finding crashes; it’s about making sure the entire experience is smooth, intuitive, and reliable from the moment someone opens it.
Your first users are your most valuable source of feedback, but they won't stick around if your app is broken. Solid QA isn't a cost; it's an investment in a successful launch and the positive reviews you'll need to survive.
To do this right, you need to cover all your bases with several distinct types of testing. Each one looks at your app's quality from a different angle.
The Essential Testing Methods for a Polished App
A comprehensive testing strategy is more than just having one person poke around for a few hours. It’s a methodical process that validates everything from your core features to how the app behaves under pressure.
Here are the non-negotiable tests your app needs to pass:
Functional Testing: This is the most straightforward check. Does the app actually do what it's supposed to do? Testers will systematically go through every single feature, button, and user journey to confirm they work exactly as designed.
Usability Testing: This goes beyond just "does it work?" and asks, "is it easy to use?" Real users are given tasks to complete while testers observe their behavior. This is where you uncover that your navigation is confusing or a key feature is basically invisible to a fresh pair of eyes.
Performance Testing: How does your app hold up under stress? This is where testers check for speed, responsiveness, and battery drain. An app that lags or sucks a phone's battery dry is an app that gets deleted. Fast. Apple's own guidelines emphasize that a responsive app should feel instant, often completing tasks in under a second.
Compatibility Testing: Your app has to work perfectly across a huge landscape of devices, screen sizes, and OS versions. This phase ensures a consistent, high-quality experience whether someone is on the latest iPhone or a three-year-old Android.
This structured approach to bug-hunting ensures that the version you submit to the app stores is stable, polished, and ready to make a great first impression.
Getting Ready for Your App Store Debut
With a fully tested and approved app in hand, the final hurdle is preparing it for the app stores. Both Apple’s App Store and the Google Play Store have their own specific rules and review processes. Nailing this part is crucial for a smooth approval.
Think of your submission as more than just uploading a file; it's a marketing package designed to sell your app to both the store reviewers and your future customers.
Here's a quick checklist of what you'll need:
Developer Accounts: First things first, you have to register for a developer account with both Apple ($99 per year) and Google ($25 one-time fee). This is non-negotiable.
A Killer Store Listing: This is your sales pitch. It includes your app's name, a detailed description, and keywords. Your description needs to scream value, clearly explaining what problem your app solves and what its best features are.
Eye-Catching Visuals: High-quality screenshots and an app preview video are absolutely critical. People often decide whether to download based on these visuals alone. Don't skimp here.
A Clear Privacy Policy: If your app collects any user data at all, you must have an accessible privacy policy. Make sure it's written, hosted somewhere, and linked in your store listing.
Once you hit "submit," your app goes into review. Apple's process is notoriously thorough, but both platforms check for guideline compliance, stability, and overall quality. If you’ve prepared carefully, you’ll navigate this final step with confidence and get your app into the world.
Driving Growth After Your App Launch
Popping the champagne for your app launch is a huge milestone, but it’s the starting line, not the finish. The real work of building a successful product starts now, and it’s all about growth, listening to your users, and constantly getting better. A “launch it and leave it” mindset is the quickest way for your app to fade into obscurity.
Your immediate focus has to shift to maintenance and monitoring. That means having a solid plan for regular updates, squashing the inevitable bugs your first users will find, and rolling out security patches to keep everyone’s data safe. This consistent upkeep is what builds trust and shows your users you’re in this for the long haul.
Let Your Users Guide Your Next Moves
Those first users? They’re a goldmine of information. It's critical to open up channels for them to talk to you, whether it’s through in-app surveys, support emails, or app store reviews. This is the qualitative data that tells you the why behind what people are doing.
You’ll want to pair that with the hard numbers: your Key Performance Indicators (KPIs). Tracking metrics like daily active users, how long people stick around in each session, and your retention rates gives you the quantitative proof of how your app is actually being used.
By blending what users say with what they do, you can make smart, data-driven decisions about what to build next. This feedback loop is the engine that drives sustainable app growth.
Get Found with App Store Optimization
Just because your app is live doesn't mean anyone will find it. This is where App Store Optimization (ASO) comes in. Think of it as SEO for your app. It’s the ongoing work of making your app more visible in the Apple App Store and Google Play Store to drive organic downloads.
Effective ASO involves a few key moves:
Keyword Optimization: Figure out what terms your ideal users are searching for and weave them into your app’s title and description.
Visual Appeal: Keep your screenshots and app icon fresh. Regularly updating them to show off new features makes your listing look professional and current.
Encouraging Reviews: Gently prompt your happy users to leave positive reviews and ratings. Good ratings are a massive signal to the app stores' ranking algorithms.
Staying on top of these practices is crucial, especially as tech trends shift. For example, Artificial Intelligence is a massive force right now. AI chatbot apps have seen a staggering 112% year-over-year growth rate. With the AI market projected to hit $407 billion by 2027, building intelligent features into your app could be a huge differentiator in future updates. You can dig deeper into these kinds of powerful app development statistics and trends to stay ahead of the curve.
Got Questions? We've Got Answers
Building an app brings up a lot of questions, especially around the big three: cost, time, and platform. I've walked countless founders through these same uncertainties, so let's clear them up with some straight answers based on real-world projects.
How Much Is This Going to Cost Me?
This is always the first question, and the honest answer is: it depends entirely on what you're building. There's no single price tag.
For a simple app with a handful of core features, you're likely looking at a range of $15,000 to $40,000. If you start adding more complexity like user profiles, payments, or a backend that syncs data, the investment typically climbs into the $40,000 to $90,000 bracket. For large, enterprise-grade apps with heavy integrations, costs can easily shoot past $100,000.
And don't forget about life after launch. A good rule of thumb is to budget an extra 15-20% of your initial development cost per year just for maintenance, updates, and server costs. It’s a cost many people overlook.
How Long Until My App Is Live?
Just like cost, the timeline is all about scope. If your goal is a lean Minimum Viable Product (MVP) to test the waters, you can often get that into the app stores in about 2 to 4 months. This is the smart way to start.
For a more polished app with a broader feature set, plan for a 4 to 7-month journey from the first design mockups to launch day. Anything more intricate, especially apps that need to talk to other complex systems, will almost certainly take longer than seven months.
Should I Build for iOS or Android First?
The classic platform debate. The right answer usually comes down to knowing your customer. If your market research screams that your audience is all-in on iPhones, then starting with iOS is a safe bet.
But for most businesses, the most practical route is to build a cross-platform app. This approach uses a single codebase to create an app that works beautifully on both iOS and Android. You save a ton of time and money by not having to build and maintain two separate apps, and you get to reach everyone from day one. It's a massive efficiency win.
Ready to turn your idea into a real app without the high costs and long timelines? CatDoes uses AI to build production-ready mobile apps from simple descriptions. Launch your MVP faster than you ever thought possible. Start building your app for free.
Nafis Amiri
Co-Founder of CatDoes


